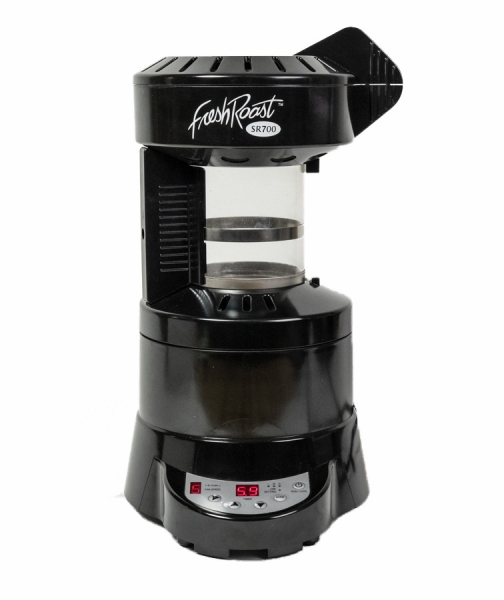


MÁY RANG CÀ PHÊ FRESH ROAST Sample Coffee Roaster SR700 - 120v
| SKU | FRESHROASTSR700COFFEEROASTER |
| Xuất Xứ / Origin | Mỹ |
| Phân Loại / Type | Máy rang mẫu/ gia đình |
Product information
Batch Size 4oz (113,4g)Control Push-button digital display or PC connect
Roast Time Variable
Manufacturer Home Roasting Supplies
Cons Fragile, It can take a little while to figure out the settings., Small batch sizes
Pros Compact, Easy to use and clean, Good visibility easy to hear the cracks, Small footprint., You have full control over your airflow, heat, and agitation
Power Supply 120V
Watts 1600
Height 12 7/8" (12,875 " = 30,48cm)
Width 6 3/4" (6,75" = 15,24 cm)
Depth 6.75 " (15,24 cm)
Weight 4 pounds (1,9 kg)
Software Included on mini CD
USB cord included
MÁY RANG CÀ PHÊ FRESH ROAST Sample Coffee Roaster SR700-120v
SR 700 Operating Instructions
 MÁY RANG CÀ PHÊ FRESH ROAST Sample Coffee Roaster SR700-120v
 MÁY RANG CÀ PHÊ FRESH ROAST Sample Coffee Roaster SR700-120v
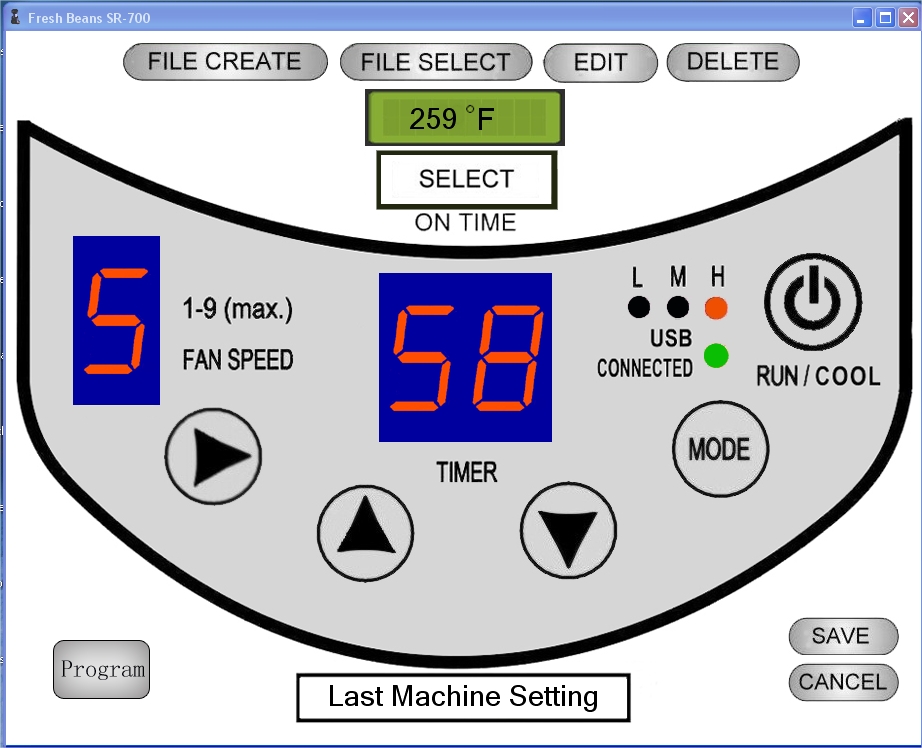
Installing Software
1- Insert the provided disk into your computer and follow the on-screen setup. 2- After the software has completed installing, you’ll be prompted to restart your computer. 3- After re-start, you will now see a small coffee roaster icon, labeled Fresh Beans Roaster. Use this program to create/save a custom roast profile.
SR700 Assembly
1- The Fresh Beans SR700, includes the following: Coffee Roaster Base, glass chamber, chaff basket, top cap, USB sync cable, 43cc measuring cup, and installation disk. 2- Refer to Fig 1 for assembly. 3- Fill the provided 43cc measuring cup 4 times. NEVER OVERFILL WITH GREEN BEANS. 4- Open the Fresh Beans Roaster program on your computer. 5- Use the supplied USB cable to connect the coffee roaster to your computer. 6- You are now ready to roast.
Roasting W/Computer Dashboard

1- Open the Fresh Beans Roaster program, connect the roaster to your computer with supplied USB. 2- The program screen will have a “USB Connected”, light. GREEN indicated the connection has been made between the computer and roaster. 3- The home screen also shows real-time temperature and time. 4- Start by clicking, FILE CREATE, to start a new roast profile 5- Enter the file name and save the new profile by clicking save. 6- The default program setting is FAN speed 5, Timer 5.9 min, and HEAT in H (high). 7- The RIGHT ARROW will cycle between the adjustable settings, Fan, timer, and heat. Be sure to click SAVE after each change. 8- Click on Program, lower left, and you’ll see your 1st step setting along with the last step, End or Cool setting. 9- You can add many steps to your roast profile. Use append to add another step in the roast profile. Remember to Save every step by clicking save. 10- Once the machine starts into the cool stage, you will not be able to adjust or add a stage. Until the machine has completed the roast. 11- After the roast has been completed, you will be able to add a step or adjust time, fan, or heat. For the next roast. 12- Remember to SAVE every change.
13- Example: Some prefer to run the machine at a high fan, low heat setting for 1-2 min to dry beans for the roast process. Start by: clicking the RIGHT ARROW, the Fan speed will start blinking, adjust with the up or down arrows, click RIGHT ARROW again, Time will start blinking, adjust up or down to 2.0. Click RIGHT ARROW again and the Heat adjustment will blink, use the up or down arrows to adjust the heat. 14. After you have adjusted your machine, you can click the save button or the machine will automatically save your adjustment after 8-10 sec. 15. To start the roast process, click the RUN/COOL button. The coffee roaster will now start from your first set. 16. The coffee roaster will also display the same values and settings as the computer. 17. Click the Run/Cool button during any time in the roast to switch to Cool mode, click and hold the Run/Cool button again to turn the machine off.